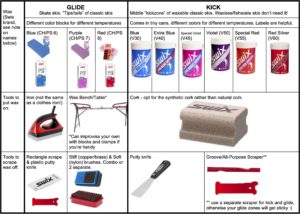
Never waxed before? Don’t let all of the information from the table above and descriptions below overwhelm you, we want to provide you with all of the resources to get you going, but just like anything else it is a learning process and you don’t need to memorize or understand it all. We are here to help you along the way!
The Basics
Classic skis need kick wax in the middle of the ski (underfoot) to provide “kick” when the skier takes a stride and pushes off against the snow. Glide wax on the tip and tail of the ski then provides the glide. The type of kick as well as the type of glide wax is based upon snow conditions and temperature. After a few skis another coat of glide wax should be applied, scraped, and brushed in order to protect the ski. Kick wax should be applied before and removed after pretty much every classic ski as snow conditions will vary from day to day.
Skate skis need glide wax along the entire bottom of the ski to provide a smooth surface upon which the skier glides from side to side. Like classic glide wax a new coat should be applied, scraped, and brushed every few skis.
Notes:
- If your child is skiing on waxless skis, there is no need to wax their skis.
- Ski bases are easily scratched and damaged. Please ask your child to avoid skiing over rocks, sticks, and other hard objects.
- Rub on glide wax can also be used to reduce the number of times that you need to iron in, scrape, and brush your skis.
Wax and Ski Preparation Tools
 Swix and Toko are both fine brands. There are many other wax brands out there with something to offer, but these are the ones that we use. The age-old advice is to pick a brand and learn it before branching out and exploring specialty solutions.
Basic Ski Prep/Care Tools
- Synthetic cork (e.g. Swix T12, consider 2 – one in skier’s pocket, one at home)
- Putty Knife (thin very flexible kind from local hardware store for removing grip wax)
- Waxing Iron (choose from Swix or Toko for applying glide wax)
- Plexiglass Scraper (4mm or 5mm recommended for removing excess glide wax)
- Combi bronze/nylon brush (e.g. Swix T159B for final removal of glide wax from base)
- Citrus-based wax remover (e.g. Swix I74)
- *consider a groove pencil and a hand structure tool
Glide Wax
- Swix HS6 (blue), HS7 (violet), HS8 (red), HS10 (yellow)
- *For families short on time, Swix offers liquid glide wax (no ironing). Liquid glide wax does not last as long as ironed-in glide wax, but the time needed to apply it is shorter.
OR
- Toko Performance blue, red, and yellow
Grip Wax
- Swix V20 green, V30 blue, V40 blue extra, V45, V55, V60
- KX35 (violet special), KX65 (red), and K22N (universal silver) klisters will cover most practice conditions
- *consider KX30 blue (covers cold icy conditions), KX20 green helps the other klisters stick to the ski if you are going out for a longer tour on a weekend.
- *The Swix V-line waxes work just fine – in fact extremely well in colder and drier snow conditions. You may wish to consider Swix VP waxes instead of V waxes for fresh wet snow (VP 45 and up).
OR
- Toko Nordic base green, GripWax blue, GripWax red, GripWax yellow
- Nordic Klister red (will cover the most likely klister needed for practice)
- *consider Nordic Klister blue (covers cold icy conditions), Nordic Klister Yellow (covers wet snow), Nordic Klister base green helps the other klisters stick to the ski if you are going out for a longer tour on a weekend.
Additional Information
The table of wax tools above was created by Hannah Chipman. The entire pdf with more waxing and tool specifics can be found here.
Robert Bradlee also wrote this great summary of ski maintenance including equipment and basic waxing and cleaning instructions.
Click here or here to learn more — much, much more — about waxing.
You can also visit our page on Ski Gear Information to see the basic set of waxes and tools that we recommend you have on hand.
The Craftsbury Green Racing Project also created some great instructional videos about kick waxing, klister application, and glide waxing.

